OpenBMC on the ASUS KGPE-D16
Making coreboot a first-class citizen in the datacenter on modern, blob-free hardware
Port Status
| Flashrom support (host R/W of BMC firmware): | Complete! | [Source code] | ||||
| Base OpenBMC System Port | Complete! | [Initial coreboot patches] | [U-Boot source] | [Kernel source] | [Poky source] | [OpenBMC source] |
| IPMI Serial Console | In progress [target Q1 2018] | [Hardware notes] | ||||
| Thermal management drivers | Complete! | [Source code] | [Hardware notes] | |||
| Overall Status | Development in Progress | |||||
| Last update: 11/15/2017 | ||||||
More Information
| Main Crowdfunding Page | ||
| OpenBMC Port Data | ||
| We are executing this port on top of the stable, known-working Facebook OpenBMC GIT repository, hash e65a7944211c70f6b5cfb6cedd73cc31105319de. Files released during development will be generated partially by modifying the files in that repository as of the linked commit. As we get closer to a full release, the entire Yocto build environment with the KGPE-D16/AST2050 patches will be made available as a monolithic tarball for end-user compilation. | ||
| Hardware Details | ||
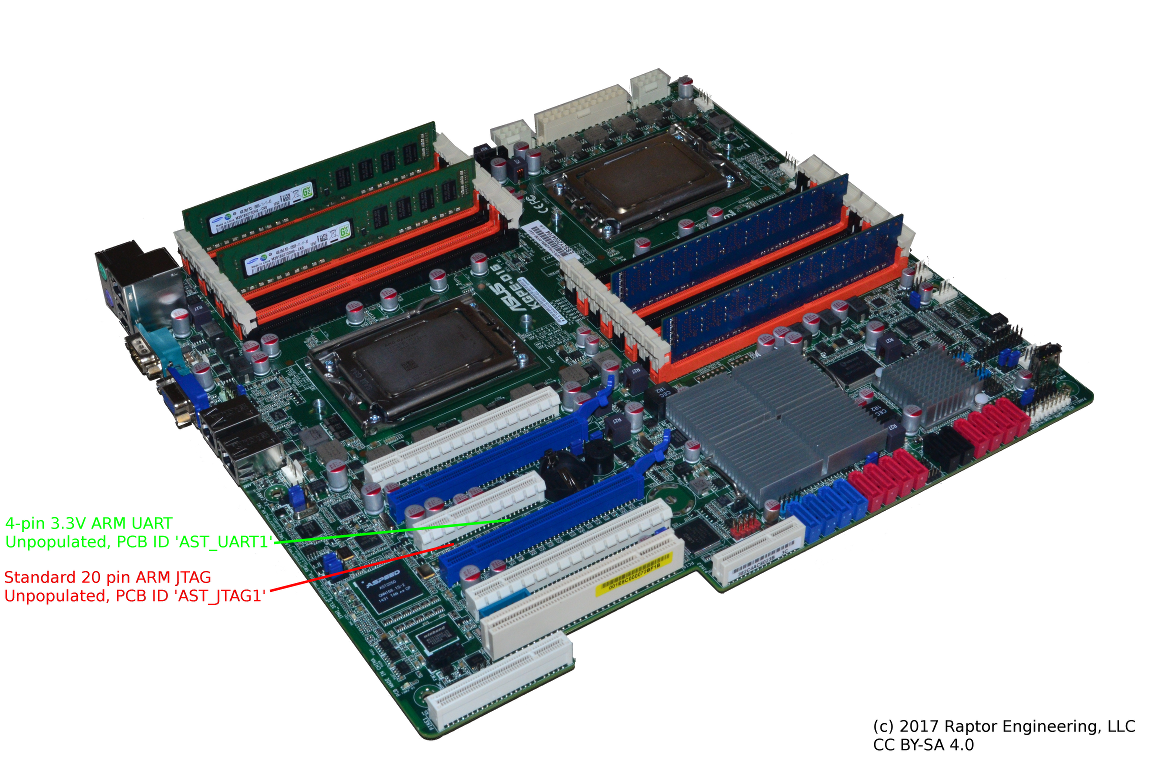
| The design team at ASUS helpfully left several unpopulated debug ports in the final production PCBs. Along with AMD HDT attachment ports, fully functional BMC JTAG and UART ports are present. These ports are one of the main reasons we were able to attempt OpenBMC development at a reasonable price point; we document them below. | ||
| No warranty, express or implied, is given for this information; any use of this information is at your own risk. | ||
|
||
| We have successfully used OpenOCD and a generic Olimex ARM-USB-TINY debug pod to control the ASpeed debug interface. The AST2050 device does not have full upstream support, and our control files only give sufficient functionality to bring up U-boot -- we do not expect OpenOCD to be able to debug the Linux kernel, for instance, without significant additional work due to the MMU coming online and missing features between the hardware and OpenOCD itself. | ||
| To use OpenOCD, a 20-pin ARM debug header needs to be soldered onto the KGPE-D16 mainboard in the unpopulated AST_JTAG1 footprint, an Olimex ARM-USB-TINY needs to be attached to the new header, and the control files listed below should be downloaded: | ||
|
OpenOCD may then be launched via the following command:
openocd -f olimex-jtag-tiny.cfg -f kgpe-d16-bmc.cfg
|
||
| NOTE: Any 20-pin compatible ARM JTAG interface supported by OpenOCD should work in place of the ARM-USB-TINY, however you will need to modify the OpenOCD launch command and possibly other parameters as needed. | ||
| Boot Sequence / Kernel Development | ||
| Once flashed onto the BMC ROM, U-Boot is capable of booting an arbitrary Linux kernel over the network. This is a significant aid during development, as it avoids the typical reflash / reboot cycle prevalent in most low-level embedded systems development. We document the general procedure below, assuming you have a TFTP server already configured. | ||
|
||
| At this point you will probably be greeted with a kernel panic after startup due to no initramfs being present, however the kernel itself is functional. Yocto builds the initramfs including the utilities required to use the BMC to control the host system; this allows a full boot into a functional BMC environment. | ||
| Yocto Build and OpenBMC Installation | ||
| Building OpenBMC requires a powerful system and some patience, along with a fast Internet connection. The build system is built on Yocto and is loosely comprised of several "layers" on top of the base "poky" tree. For those with data caps / limited Internet access, Yocto downloads all sources needed when invoked for the first build of the tree, then caches them for later builds to save bandwidth as much as possible. We strongly recommend using a dedicated installation of Debian 9 (Stretch) with gcc5 to build the tree. While building in a chroot is possible, it requires that you mount /dev/shm, /proc, and /sys inside the chroot before attempting build. Additionally, Yocto will not run as root for security reasons, so you should set up a dedicated yocto build account before proceeding. | ||
|
||
| Host Thermal Management Hardware | ||
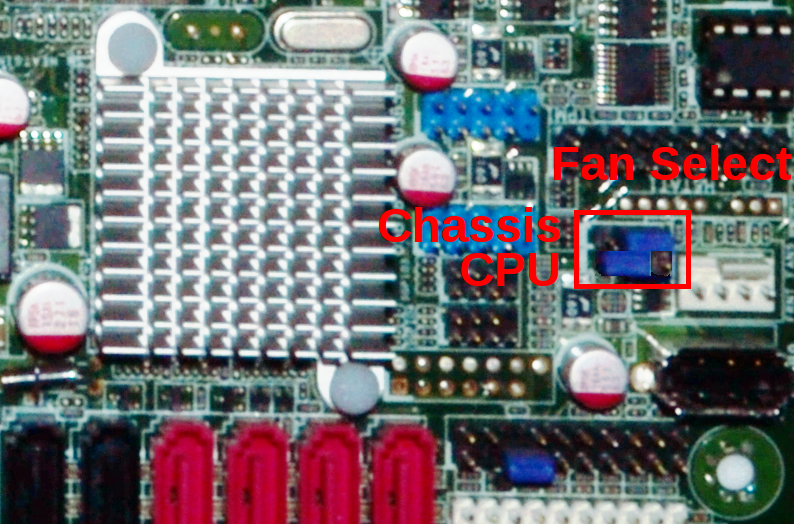
| The thermal management hardware of the KGPE-D16 is somewhat unusual and limited. The KGPE-D16 supports both 4-pin and 3-pin fans, however even though it contains a PWM controller with 8 hardware channels ASUS has only wired up two PWM channels to the fan connectors. To make matters worse, PWM channel 1 is routed to all 4-pin fans while PWM channel 2 is routed to all 3-pin fans. | ||
 |
||
| As a starting point for inidividual site customization, we have chosen to assume that the mainboard will be configured with 4-pin CPU fans and 3-pin chassis fans. This makes both hardware PWM channels available, and allows independent control of CPU and chassis fans. An initial fan curve has also been loaded for CPU and chassis fans; if OpenBMC is being deployed to a large site with identical hardware, it may be desireable to profile correctly operating CPU and chassis fans such that the damaged fan detection works correctly. With the stock profiles, damaged fans that are running slower than normal are unlikely to be detected until thermal control issues start to appear and all fans are set to 100% as a countermeasure. The stock system also assumes that all fan ports will have a fan connected, and will ramp all fans to 100% if it detects a failed or disconnected fan on any port. The operation of the fan control system can be modified by changing the fand.cpp source file and recompiling / reflashing OpenBMC. | ||
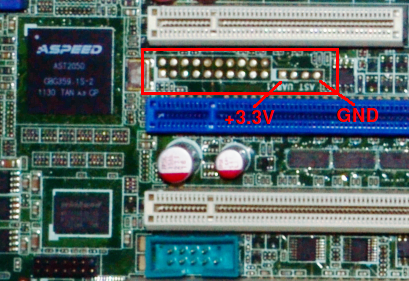
| Host Console Hardware Details | ||
| The KGPE-D16 contains two hardware serial ports, the rear DB-9 port (/dev/ttyS0 under most Linux kernels) and the internal header port (/dev/ttyS1 under most Linux kernels). When the BMC firmware module is installed, the internal serial port is redirected by hardware to one of the AST2050 serial ports. As such, the BMC is able to communicate with the host platform via serial if the host has been configured to present a terminal on /dev/ttyS1. | ||
| Serial over IPMI support is not yet present in the Yocto sources, however the host may still be controlled by logging in to the BMC over SSH and opening the BMC's /dev/ttyS0 serial port with the "screen" utility as follows:
screen /dev/ttyS0 115200 |
||
| REST API | ||
| OpenBMC exposes a REST API that can be used to monitor and control the system. Once you have determined the BMC's IP address, you may access the REST API at http://<BMC IP>:8080/api . Interesting pages include http://<BMC IP>:8080/api/sys/sensors and http://<BMC IP>:8080/api/sys/server , and the remaining pages can be discovered by navigating around the API interface. Note that some of the API pages may not display meaningful data (or in fact any data at all); expanding the number of useful API pages is a relatively simple task that the community can assist with over time. | ||
| While status information can be viewed from any Web browser, sending commands to the remote BMC requires a client that is capable of encoding the requisite POST requests. As a starting point, to power on a remote server the "curl" utility can be used as follows:
curl -H "Content-Type: application/json" -X POST -d '{"action":"power-on"}' http://<BMC IP>:8080/api/sys/server |
||
| Note that the REST API assumes it is attached to an isolated, protected network and does not require any authentication! If you intend to place the BMC on an unprotected network, we strongly recommend that the REST API and external IPMI interfaces be disabled and SSH be used as the sole BMC access method. Alternatively, a SSL password-protected extension could be written by interested members of the community; since the BMC is fully open source we look forward to seeing improvements contributed back to this project over time! | ||